
Fox4work: A Collaborative Wiki for Optimizing Inventory Management. This wiki aims to be a comprehensive and collaborative resource dedicated to Fox4work, a Warehouse Management System (WMS) software. Its goal is to centralize and share essential information for Fox4work users, whether beginners or experienced. Potential Wiki Content: Fox4work Overview: Main features of the software. Advantages and benefits for businesses. Compatibility with various storage systems (Kardex, Hänel, etc.). Guides and Tutorials: Detailed instructions for installation and configuration. User guides for various features (inventory management, order fulfillment optimization, etc.). Tips and tricks for optimal use. Integration and Interfacing: Information on integration possibilities with other systems (ASCII files, ODBC, web services, etc.). Documentation on APIs and development tools. Support and Community: Discussion forum for users. FAQs and solutions to common problems. Sharing best practices and feedback. Developments and updates: Information on new versions and software updates. Roadmap of future developments. Glossary: Explanation of technical terms related to Fox4work and inventory management. Wiki objectives: To facilitate learning and mastering Fox4work. To improve user efficiency. To promote knowledge sharing and mutual support within the community. To centralize documentation and useful resources. This wiki is intended to be an evolving tool, fueled by contributions from the Fox4work community. Envoyer des commentaires Panneaux latéraux Historique Enregistrées
Introduction and Overview
Fox4work is a software solution designed to control automated storage systems such as Kardex, Lista, Thurmetal, or Hänel. It ensures precise inventory management (locations, alternative items, FIFO) while automating warehouse workflows. Its middleware architecture allows for seamless integration with third-party ERPs. Accessible via a web browser, it also features optimized picking tools tailored for field operations.
Table des matières
Project module
Operation in Project mode :
Creation of project :
To create the project, simply go to the Service button  in KDX mode.
To add a project, simply click on one of the two Add buttons on the page, either at the bottom of the page  or at the top right
  .
.
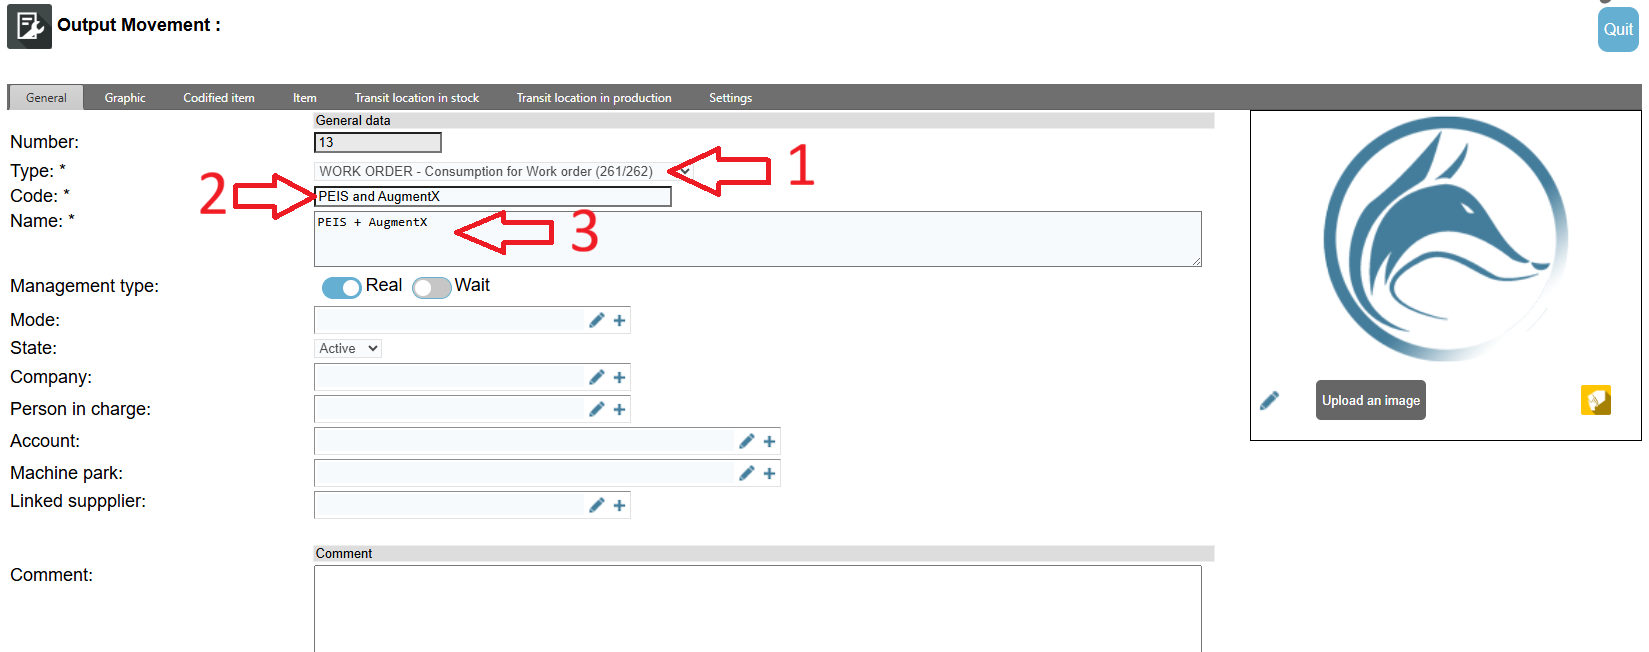
- 1. From the drop-down list, select WORK ORDER.
- 2. Enter the project code (None of the following characters should be used: / ? # & = @ [ ] )
- 3. Enter the full name.
- 4. Don’t forget to save.
Creation of box project :
To create project box, go to the Transit button  in PRO mode.
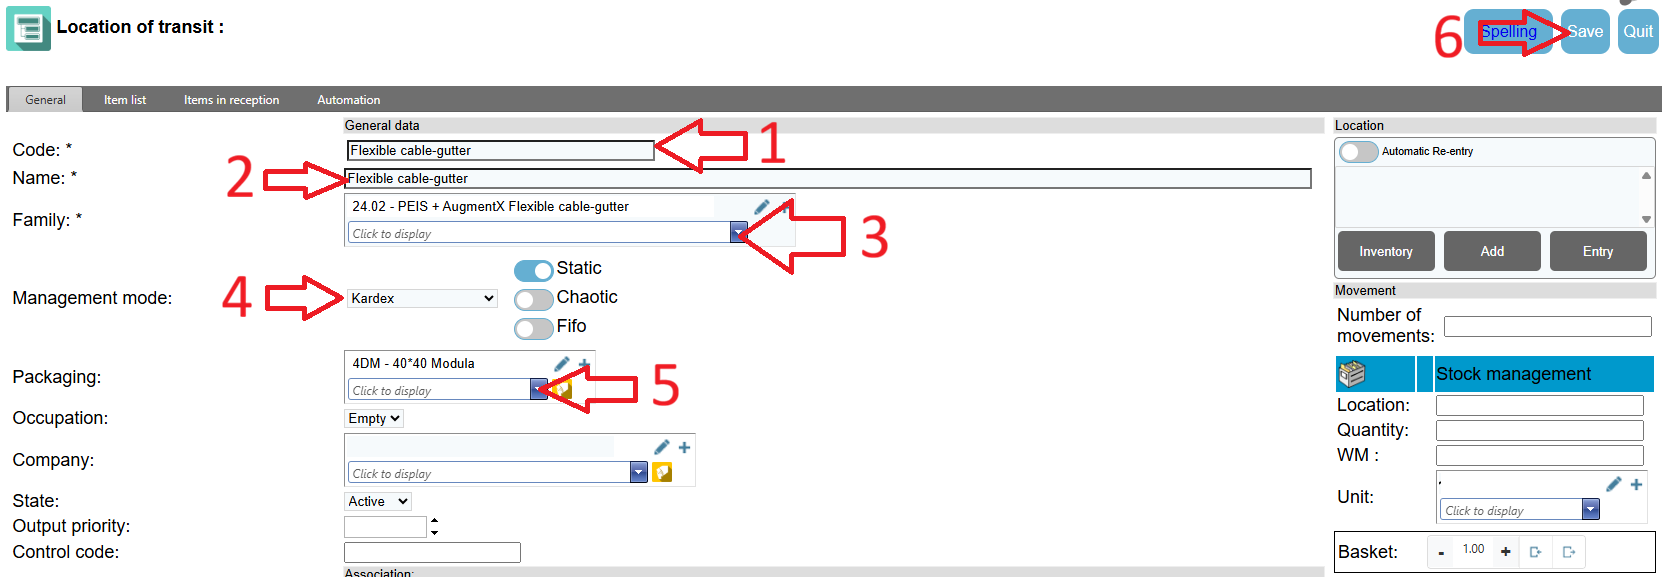
- 1. Enter the code from the box
- 2. Enter the name of the box
- 3. Select the box family
- 4. Select the management mode (Kardex)
- 5. Select the size of this project box
- 6. Don’t forget to save.
Link the project box to a location in the Kardex :
To do this, you must first create the locations on the tray. To do so, refer to the section entitled ‘Creation of location in the tray:’ in the documentation.
To link the project box to a location in the Kardex, simply click on the Project Input button .
.
You must select a project that you have previously created so that the project box is also linked to it.

Then press the New Location button  .
.
- 1. Select the size of the packaging for the project box you created in Transit
- 2. Select the code for the project box you created in Transit
- 3. Select the location in the kardex (here 101.1022.025.001.001 -> 101 = machine number, 1022 = tray number, 025 = X coordinate of the bottom left corner of the box, 001 = Z coordinate of the bottom left corner of the box and 001 = Y coordinate of the bottom left corner of the box)
- 4. Then link the location to validate the location of the project box

Pour ajouter des pièces dans ce bac projet, désormais localisé dans le kardex, consultez simplement la section ‘Project Input’ de la documentation.
Project Input :
Whether the project bin already contains similar items, whether it is a new item, or whether it is empty, the procedure for adding items remains the same.
Click on the Project Input button  :
:
You must select the project in which you wish to input items.

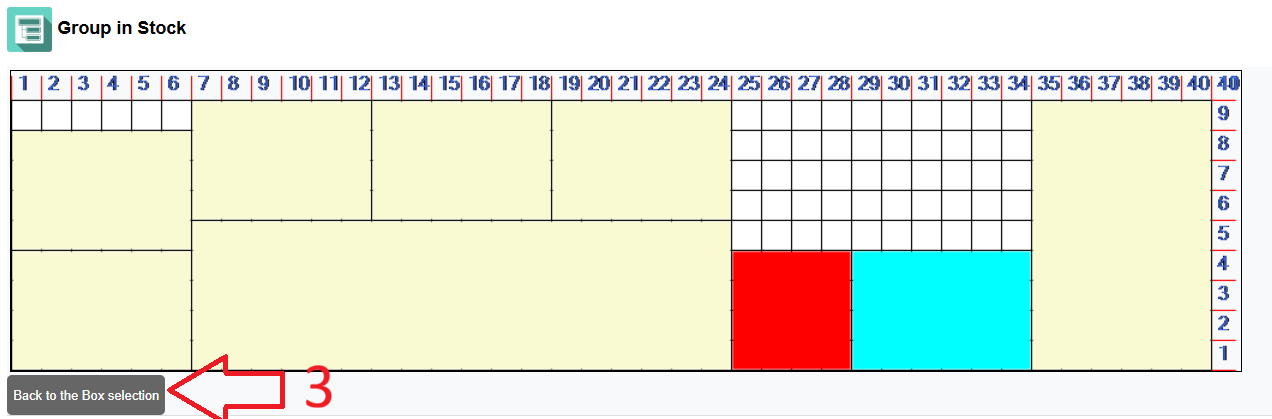
- 1. Select the project box in which you wish to place items.
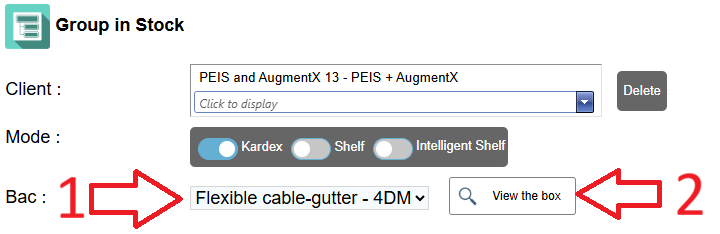
- 2. If you click on View the box, the location of the back on the tray will be shown in red, the location of the slots already occupied will be shown in blue, and the unoccupied slots will be shown in yellow.
- 3. Click on the Back to the Box selection button to return to the box selection.
Once you have selected the box in which you wish to place coins, simply press the Tray OUT button  .
.
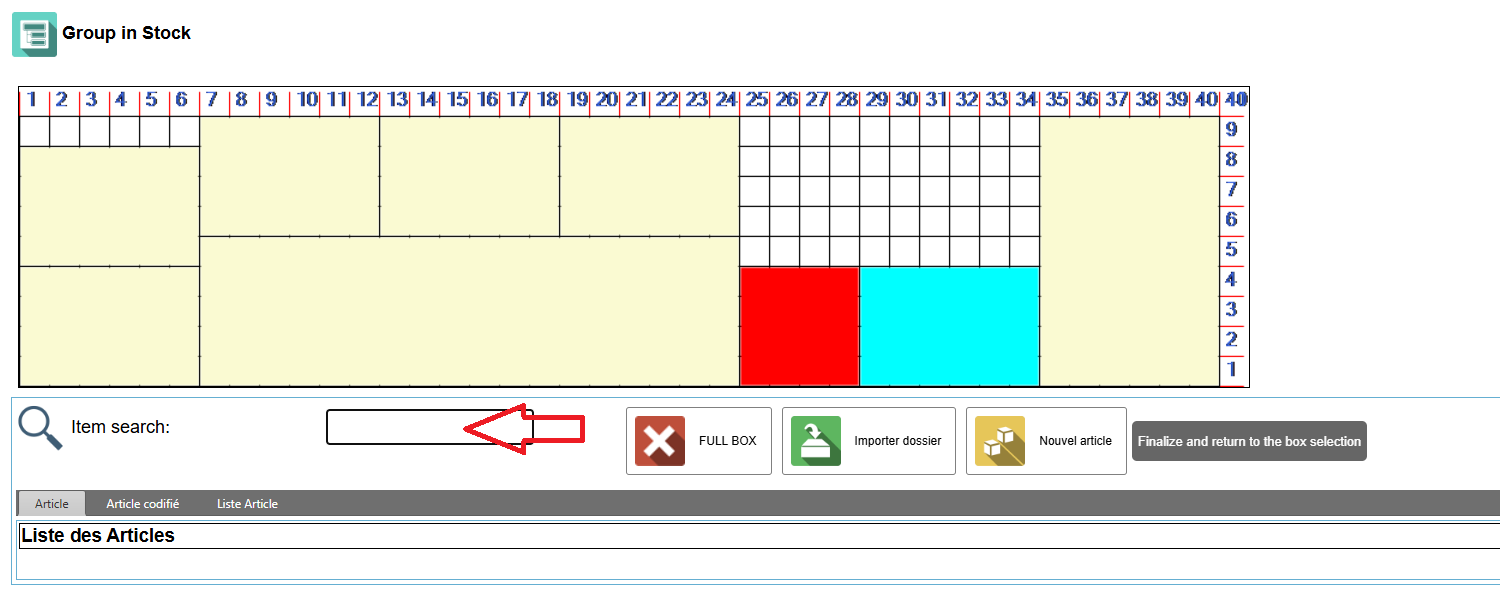
The tray should then pop out and you will see this page displayed:
You will then need to search for your item in the search bar provided for this purpose, or if you want to see all the items, simply press the space bar three times and then enter.
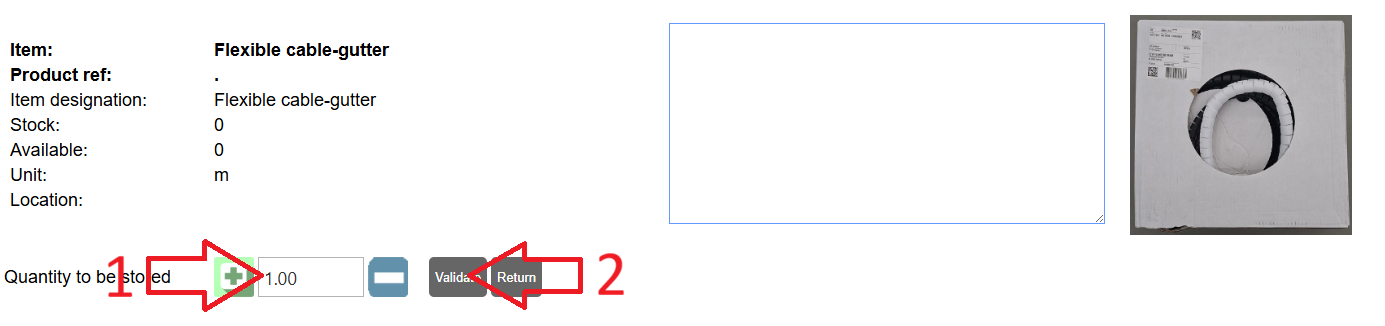
Once you have chosen your item, simply place your items in the red slot and then:
- 1. Enter the number of items you have placed.
- 2. Then validate.
Next, you will return to the item search page. Follow this procedure to enter all the items in this project box, then simply press the Finalize and return to the box selection button.

Project Output :
Click on the Project Output button  :
:
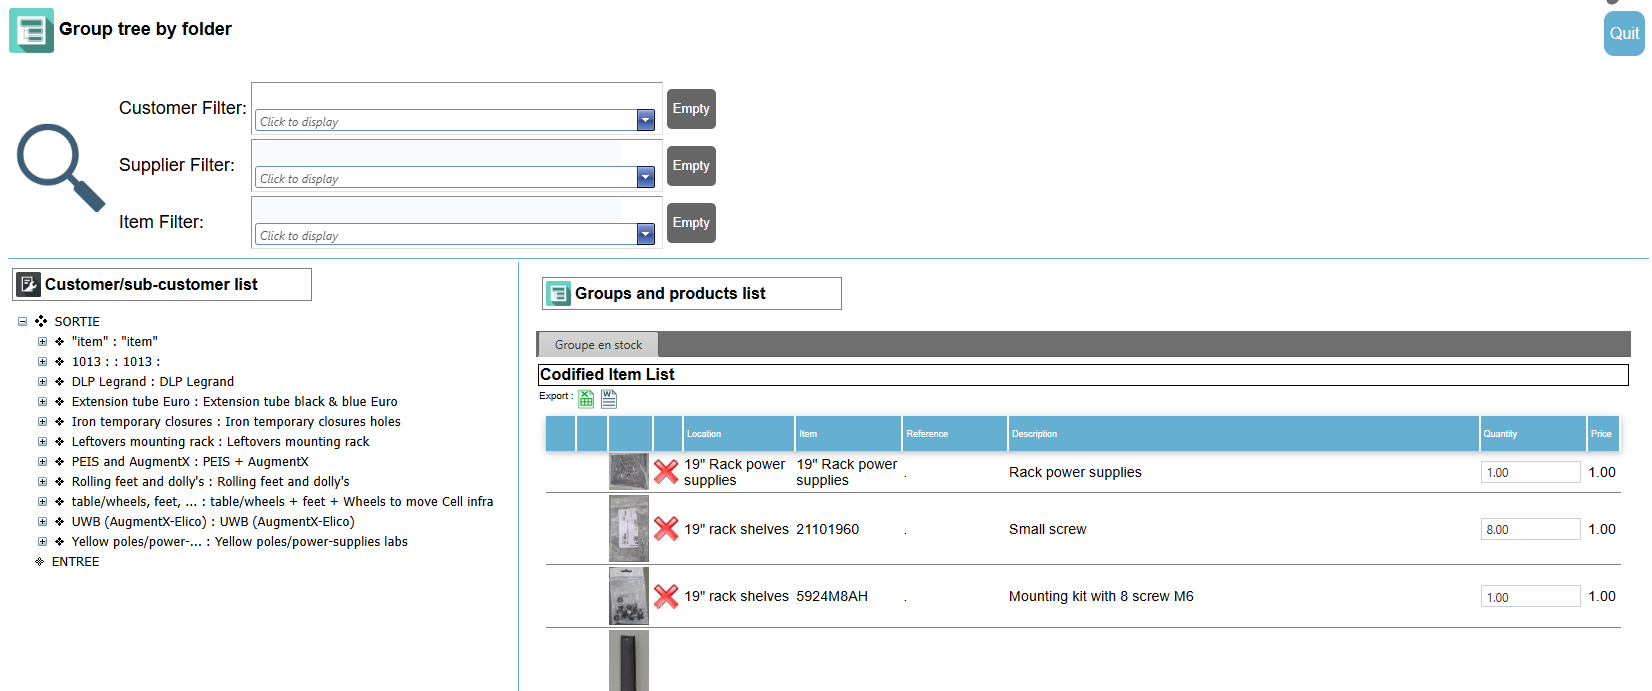
You will arrive at this page,
- At the top of the page, you will find filters (by project, by supplier, and by item).
- At the bottom left, you will find the project tree structure and project boxes.
- And on the right, you will find the item
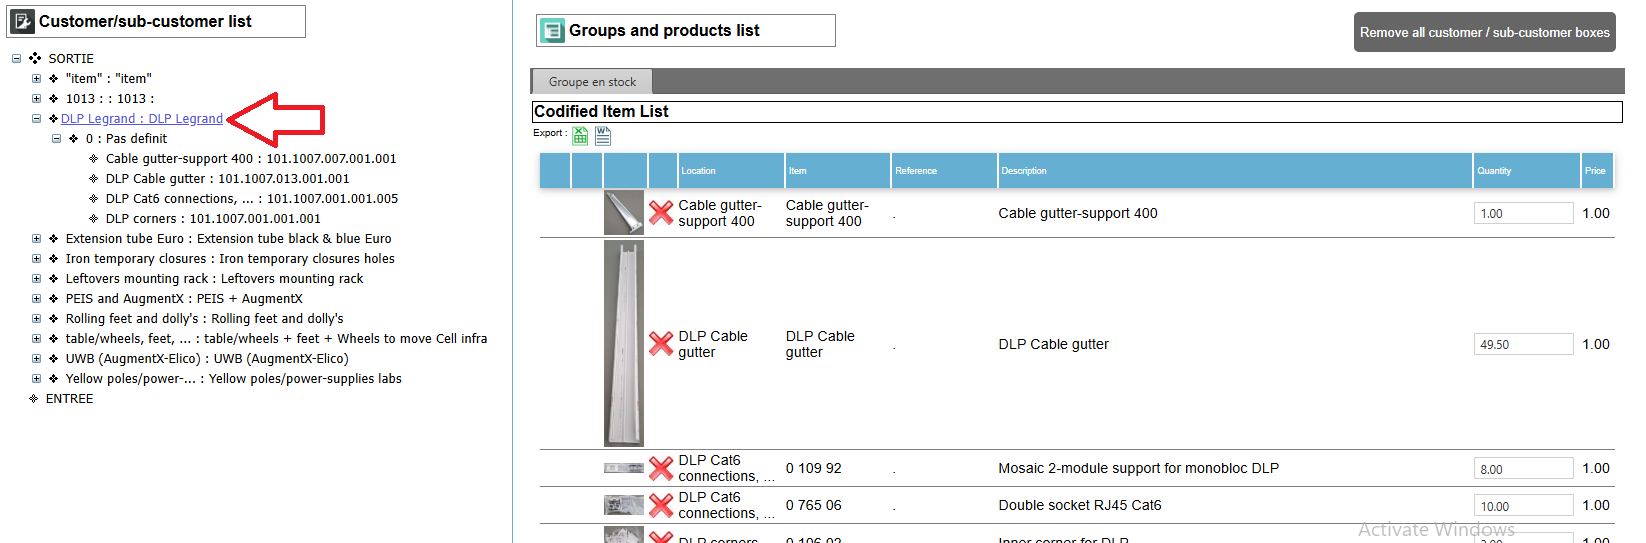
If you click on a project in the tree structure, its project boxes will expand and on the right-hand side of the page, you will only see the items in the selected project.
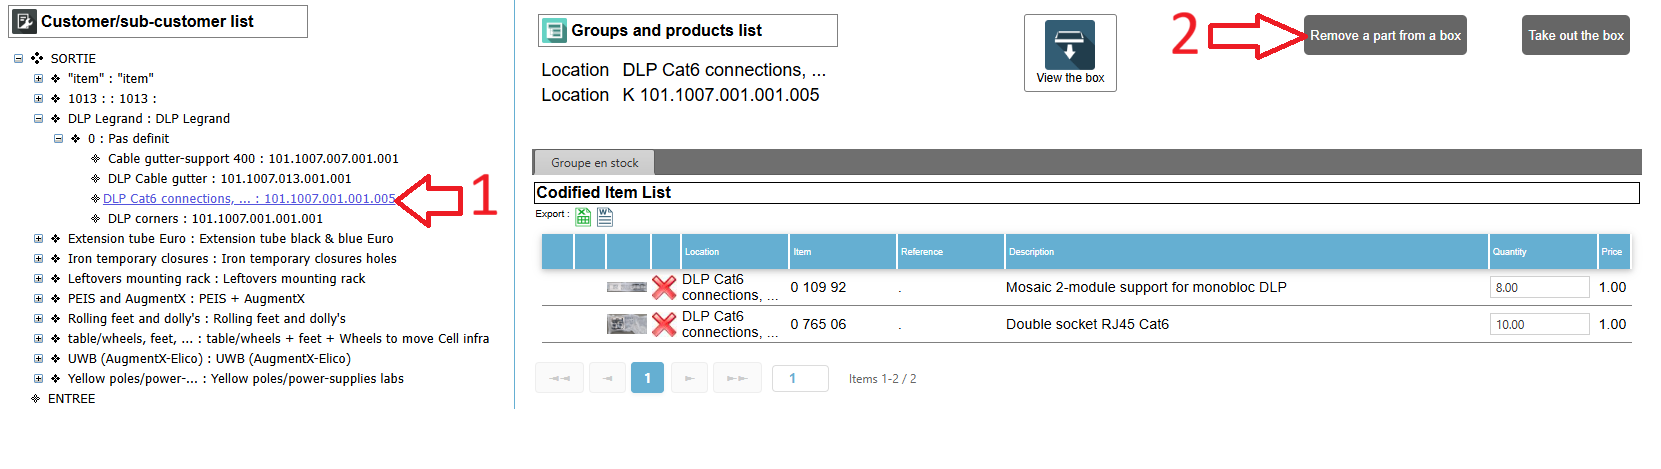
- 1. If you then click on a project box, you will see the items in that project box on the right-hand side of the page.
- 2. To remove an item from this project box, simply click on the Remove a part from a box button.
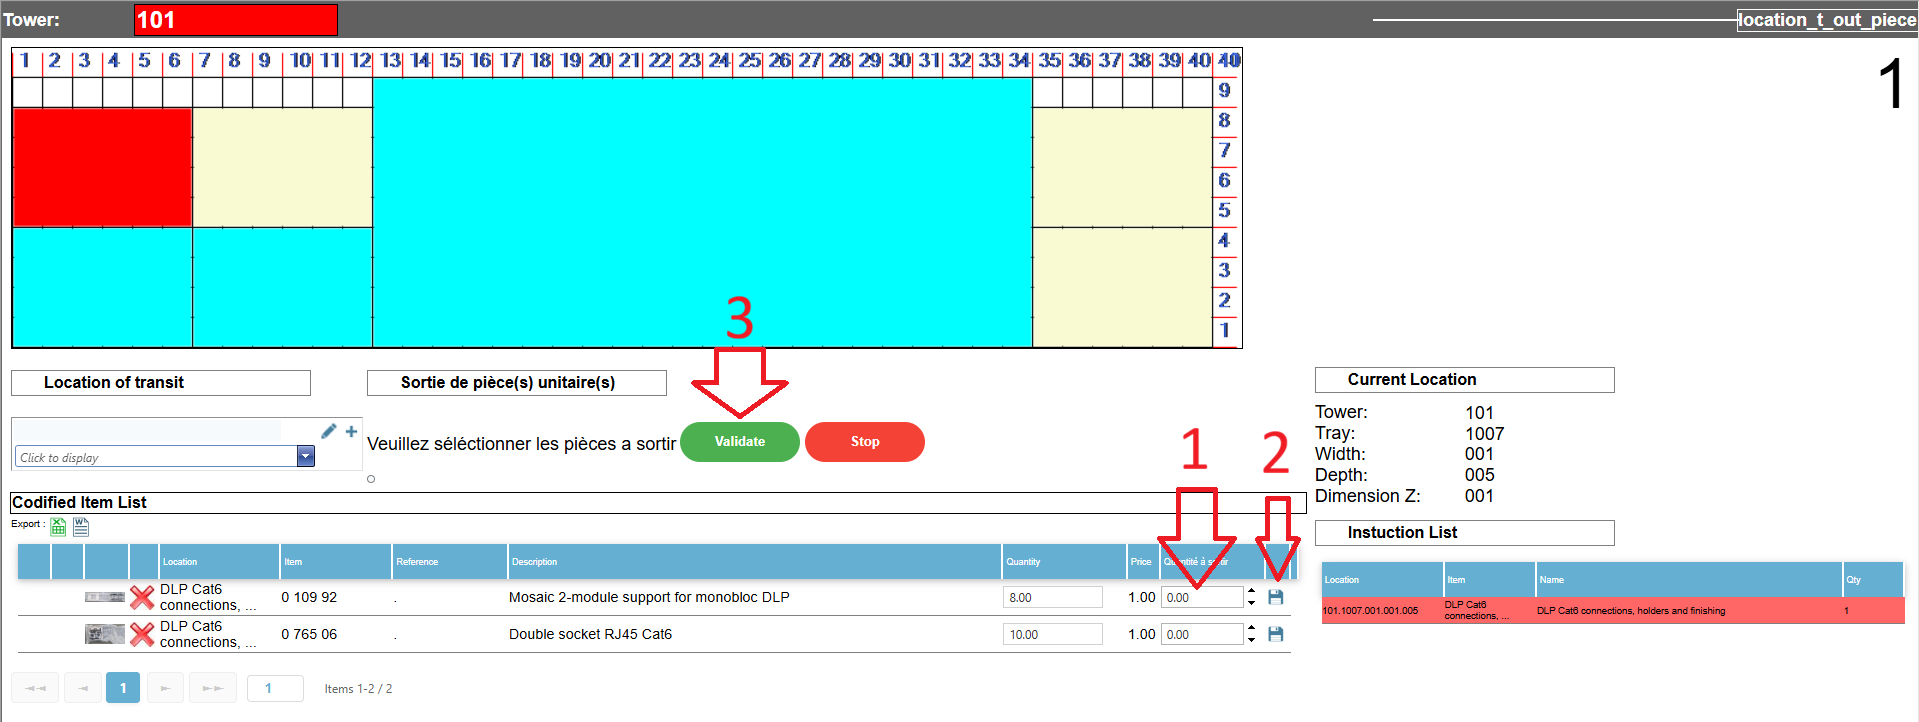
The tray will then arrive in front of you and this page will be displayed. All you need to do is:
- 1. Indicate the number of items picked for each item.
- 2. Save the number of items picked for each item.
- 3. Once all the desired items have been taken from this project bin and the quantities have been entered in the appropriate columns (1 et 2), you will need to Validate.
Find the project boxes in which an item is located :
To do this, simply go to the page for the item you want, then go to the Transit location tab for that item:
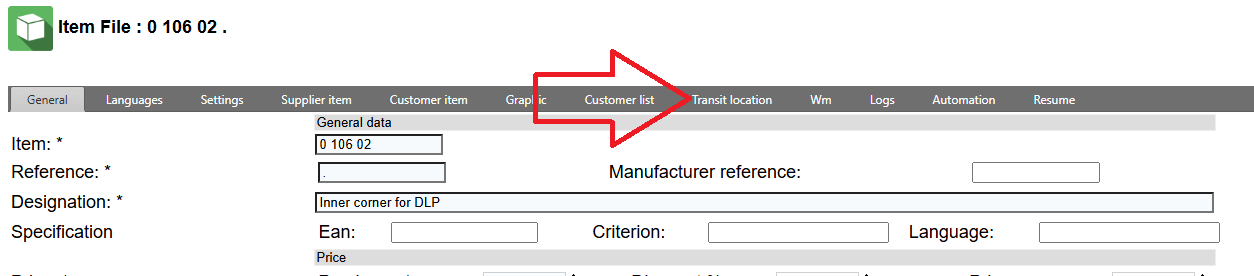
Once in this tab, you will see the following information:
- 1. The column indicating the project bins in which the item is present
- 2. The location (Kardex or shelf)
- 3. The description of the item
- 4. The quantity of the item present in each project box
Introduction and Overview
Fox4work is a software solution designed to control automated storage systems such as Kardex, Lista, Thurmetal, or Hänel. It provides precise inventory management (locations, alternative items, FIFO) while automating warehouse workflows. Its middleware architecture ensures seamless integration with third-party ERPs. Accessible via web browser, the platform also offers optimized picking tools specifically designed for field operations.
Prerequisites and Installation
Fox4work requires a compatible server environment (OS, SQL database, web server) and a stable network infrastructure. The installation, carried out by qualified technicians, includes the configuration of automated storage systems, peripherals (scanners, etc.), and ERP integration. Comprehensive testing and user training finalize the commissioning process.
Table des matières
Configuration
Fox4work interfaces with a wide range of peripherals to automate and streamline warehouse logistics. It supports the integration of printers (labels, documents), vertical storage systems like Kardex, and mobile robots (AMRs, conveyors), ensuring centralized control, real-time stock synchronization, and a significant reduction in errors.
Table des matières
- Fox4work – Special settings
- IIS Configuration
Peripheral Configuration
Automated Storage Systems
- Hänel
Kardex
- Kardex C2000
Kardex C3000
- Kardex ILA TIC
- Kardex Navigator
Kardex VBM LR35
Modula
- Movu atlas 2D
- System Schultheis
- Temrex Electroclass
Camera
- Pick-to-light
- Picking Robot
- Printer
Scale
- Special Configurations
- SQL Server Database
Settings
Fox4work interfaces with a wide range of peripherals to automate and streamline warehouse logistics. It supports the integration of printers (labels, documents), vertical storage systems like Kardex, and mobile robotics (AMR, conveyors). This ensures centralized control, real-time inventory synchronization, and a significant reduction in errors.
Table des matières
Fox4work – Special settings
Sql Server
Advanced Features and ERP API Integration
This section details Fox4work’s interfacing mechanisms with the market’s leading ERP systems (such as SAP, Microsoft Dynamics 365, Oracle NetSuite, Sage, or Infor). It covers the setup of standard connectors and REST API endpoints to automatically synchronize item master data, picking orders, supplier receipts, and stock levels. It also describes message queue management and asynchronous communication protocols that guarantee real-time stock movement reporting back to your ERP without any data loss.
Table des matières
Business Central
- CARL Software Integration (Berger-Levrault)
- Carpac Integration
- HL7 Medical Protocol Integration
- Logyplan Integration
- Microsoft Dynamics 365 Business Central Integration
- Microsoft Dynamics AX Integration
- MKG Integration
- Odoo Integration
- ProAlpha Integration
- R-Mes Integration
- SAP Business One Integration (Linked Server & Exchange Tables)
SAP ECC / S4 HANA Integration
- Sylob ERP Interface & Fox4Work
- Wolters Kluwer (Brilliant) Integration
- XPower Integration
- FOX4Work API Documentation: Main Endpoint
Getting Started
Discover the basics of Fox4work to efficiently manage your inventory using automated storage systems. Fox4work guides every logistical phase, from receiving to shipping. After the initial configuration (locations, stock rules, ERP integrations), the WMS manages receiving operations, storage optimization, order picking, shipping, and performance analytics. Each step is automated and controlled in real-time to maximize productivity and accuracy, allowing you to easily interact with your storage lifts to optimize daily operations from day one.
Table des matières
Troubleshooting and Support
This section features IT troubleshooting guides to quickly resolve incidents related to the Fox4work WMS. It includes procedures for diagnosing connection losses with automated storage systems, resolving ERP synchronization errors, managing web interface access issues (browser, certificates), and restarting peripheral services or drivers (scanners, printers). If the issue persists, our technical support teams are available for advanced assistance.